There’s only one thing more fun then being in Quiltmaker’s 100 Blocks issue… and that’s being featured with lots of friends and rock-star quilters - and I’m so honored to be amongst them! I kind of fudged a little… I’m using the alternate cover image that features Camille, Laurie, Elizabeth, Pat, Pamand me AND ME!
You can follow along on the 100 Blocks Blog Tour, and even have a chance to win prizes and an issue. Tomorrow (9/13) is my day on the tour, so leave me a comment - and for jollies tell me your favorite 2-color combo. Or tell me whatcha makin’ for dinner. I’ll draw a name from all the entries posted by 12:01am PST Nov. 14th, 2009 (that’s right, mmmm-hmmmm… I’m not messin’ around with Friday the 13th), and the winner will be sent a copy from the nice folks at Quiltmaker. It’ll be so fresh off the press you’ll be able to sniff it like a ditto.
Is it a coincidence that Pam’s block (#90) and my block (#89) use the same fabrics (Sweet, by our pals the Urban Chicks)? Is it a coincidence that Pam’s block and my block are great companion blocks and look Sew Happy Together?
I don’t know who the genius is who thought up the QAYG method and I learned this second, maybe even third hand - but this is how I do my QAYG. Previous post about the stitchery is here.
1. For my 4-block quilt, I used two 1¾” strips (then folded) and two 1⅛” strips - the length of the backed and quilted block to make my rows. To join my rows, I have one long 1¾” strip (then folded) and one 1⅛” strip. After I measure my completed rows I will cut the strips to that length.
2. Join a 1⅛” strip, rights sides together on top of the block and the 1¾” folded strip the back of the block (raw edge to raw edge). Join by stitching a ¼” seam.
3. Flip top strip over. Press.
4. With right sides together, I join the next block to the top strip.
5. Raw edges together, join by stitching a ¼” seam. Flip block over and press.
6. On back side of row, flip over folded strip and stitch with a slip-stitch. If you love stitching binding down… you will love this. The technique is the same.
7. Join your rows in the same manner as joining the blocks into rows.
I’ve been to do a Quilt As You Go demo at a quilt retreat this weekend and decided to embellish my little QAYG project with some stitchery.
Natalie of Cinderberry Stitches has some ADORABLE free projects on her blog (check out her sidebar), and I used her Sweet & Spotty Needle Wallet birdie (ie, I only used partial of the drawing for the sake of time). So cute are Natalie’s drawings I couldn’t make just one. No… I had to make four and use them for my blocks on my QAYG demo/tutorial in my next post here.
My inspiration stares me in the face each and every day. As does my mysteriously constant desire for 2/99¢ Jack in the Box tacos.
Inspiration on the design wall… so close it could bite me.
A quick trip to Joann’s… some budget “felt”, some floss, a coupon and a twenty… I smell a Halloween costume.
No plan, no pattern. I just held my breath, cut, and then prayed. I used SIX strands of floss. That called for a really big needle, and some very sore fingers.
It’s beginning to look a lot like Москва.
And now I crave 2/99¢ Jack in the Box tacos with beets and cabbage. Tah dah… I’m Matryoshka in the Box!
Dang I’m hungry. No candy for me… tacos please!
HAPPY HALLOWEEN!
Tomorrow’s the big day! I always love seeing the H’ween costumes on the Today show, Jimmy Kimmel Live and Frosty, Heidi and Frank - and seeing what clever ideas they come up with. This is the ONE DAY it sucks for me not to have a job to go to. I so miss the work dress-up day - so I’m gonna have a little trick or treatin’ office party on my blog tomorrow. It may just be virtual nonsense… but I’m giving away pretend candy at my pretend party thrown by my pretend party planning committee. And I’m not handing out that fun-size crap… I’m pretending to give full size candy bars. And if you leave a comment that you’re dressing up too… you get TWO pretend full size candy bars. Here’s a peek at my costume - it’s almost done. Any guesses?
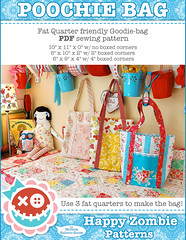
I had so much fun with making my Poochie Bag pattern… I decided I’d make some Itty Bitty Poochie Bags too. Pee wee fun size bags.
Itty bitty Trick-or-Treat bags filled with treats. H’ween fabric used is from my stash cupboard - it must be 5+ years old and I have no idea who/what it is.
Originally I was going to call them Poochie Bagettes… but my mind thinks in food - and it looked like “baguette” - and all I wanted to do was stuff the bags with feta, basil, balsamic vinegar and tomato slices. Thanks to Jenny for helping me with the name. Messy food crisis averted.
While I was sewing my Itty Bitty’s… I had a visitor just outside my window. This is Frank.
Frank alerted Frosty and Heidi that I was on to them.
Side-show over, back to sewing. Giving the Itty Bitty’s some “pooch” is easy. Just pin up the bottom corners - and tack with a few hidden stitches.
Ready to be filled. And not just for kids! The Itty Bitty’s interior measures at about 4½” square (4″comfortably). What to put inside… any treat filling ideas?
I have a tutorial at the Moda Bakeshop for the Itty Bitty’s. I’ve used Moda Layer Cake sheets of American Jane’s Happy Campers and fabric ribbon to make the Itty Bitty’s. Very yummy harvesty vintageishy looking fabric - I just love it.
My favorite thing about the Itty Bitty’s… they’re the carrier for Ding-Dong-Ditch.
Edited in:
GASP! Look at Kimberly’s Itty Bitty’s! So darn cute - she’s a fabric whisperer!
I did it. I made the transition from flip-flops to shoes - and feeling rather Halloweenishy. Huge thanks to Calamity Kim for showing the cutest shoes EVER on her flickr. Kim kindly led me and my plastic money down the cute shoe path. The T.U.K. Women’s Cat Mary Jane can be found here. I have a foot issue - so I took my seam ripper and removed the straps. Tadah… my Meowy Janes!
These shoes should come with a warning. You will be stopped by the nicest people where ever you go with Meowy Janes on your feet - your shoes will be admired and inquired about. Not for the shy or anti-social. This concludes the warning.
I’m late to the Blogger’s Quilt Festival (thank you Amy!)… but hey, I was making everyone pancakes. What a night… I don’t think anyone slept last night. But then, who sleeps at slumber parties? Really. I need a nap, and it’s only Day Uno of the party - and there’s lots more room for lots more NMG peeps.
So last Festival I cheated and showed two quilts. This Festival… I’m showing one. I’ve turned over a new leaf and am playing by the rules - and today I am good and on my best behavior (tomorrow I go back to my old disobedient and risqué ways… and don’t be surprised if you find zucchini in your apple pancakes - which of course I will deny).
Not just because I love the colors, or the fabric, or the quilt pattern… it’s because it’s my “Wonder Twin Super-Powers Activated” quilt. About 2½ years ago Pam surprised me with the cutest little bundle of some Windham fabric from her stash…
and unbeknownst to each other - we were each making a quilt from the SAME quilt pattern from the SAME little Japanese quilt book called “Square Patchwork” at the SAME time. Photo above is right after I made it - at my previous home - and apparently I was a much neater and organized person back then. Book info: Square Patchwork ISBN4-8347-6441-9
It was all very Gift of Magi like - but Pam’s and my watches and hair survived unscathed. I have very, very, very little wall space in my teenie weenie studio… but this is one quilt that I will find space for so I can look at it every day. Everything gets moved around this quilt. What’s in front, beside, above and below is dictated by the quilt (like the birdie branch a friend made). Yup… WTS-PA rules the roost. At least the wall roost.
Baby Happy is one of two quilts from my “Two Happy” FREE pattern that I designed featuring Lecien’s “Old New Fabric Collection 30’s” fabric collection.
One pattern. Two Quilts. One for Momma, one for Baby. This free for download pattern is available here.
 There’s only one thing more fun then being in Quiltmaker’s 100 Blocks issue… and that’s being featured with lots of friends and rock-star quilters - and I’m so honored to be amongst them! I kind of fudged a little… I’m using the alternate cover image that features Camille, Laurie, Elizabeth, Pat, Pam


 Farting around with needle & thread and then blogging about it.