One last Olympic/Vancouverage mention. TWO actually. First… I can’t thank everyone enough for all the kind and enthusiastic comments on my Vancouver post! I wanted to email everyone back and thank them, but I messed up my in-box juggling between my laptop and my desktop (a common occurrence in my little corner of chaos). A special thank you to my Canadian commenters… THANK YOU and I was so deeply touched!
Second. Did anyone else drink the Curling Kool-aid? I went nuts over it. NUTS I tell you… NUTS! I even found myself shouting “hard hard hard hard…” as I was Swiffering my kitchen the other day. There’s just something about curling that appeals to me so much.
1. There’s strategy (though I prefer strategery).
2. There’s skill and teamwork involved.
3. You get to play with friends and chit-chat while playing.
4. You get to yell things like “hard, hard, hard, hard…”.
5. Dazzling team uniforms!!!
I got swept up in the Norwegian Men’s Curling team pants… The Pants. Who knew obnoxious golf pants could be cool!

Photo credit: Associated Press/Yahoo Sports
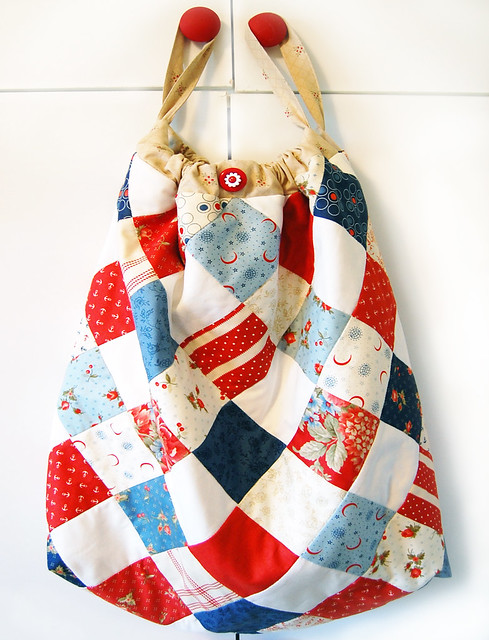
I decided I wanted a piece of the Loudmouth pie - and made a Norwegian Curling Pants Market Bag. I used my Better Homes & Gardens - Quilts and More Fall 2008 “To Market, To Market” bag pattern (page 50 if you have the issue) with a few minor modifications.
The To Market, To Market pattern is available online free at BHG’s All People Quilt. I don’t know if you have to sign up to be a member first… but you’ll want to be a member anyway!
I used Moda’s new Minick & Simpson’s Bar Harbor layer cake “slices” to make my outer bag as well as the liner. I used some yardage from my stash for the casing and strap - which just so happened was some Minick & Simpson Prairie Paisley. Who knew Laurie and Polly’s Americana could also be so Norwegian-ishy… Norwegiacana… Norde-cana.
Grab the pattern/instructions at BH&G’s All People Quilt here.
Modify the 19″ x 15″ x 5″ bag pattern instructions to make a 20″ x 16″x 5″ bag.
+-+-+-+-+-+- Modifications are in bold.-+-+-+-+-+-+
Casings
ORIGINAL:
From blue polka dot, cut:
2) 3½ x 39½” strips
MODIFICATION:
From tan print, cut:
2) 3½ x 41½” strips
—————-
Strap
ORIG:
From brown print, cut:
2) 3 x 26½” strips
MOD:
From tan print, cut:
1) 3½ x 42″ strip
—————-
Outer Bag
ORIG:
From red print, cut:
2) 20½” squares
MOD:
Follow materials needed, cutting and piecing
directions below to make two 21½” quilted bag units.
—————-
Liner
ORIG:
From muslin, cut:
2) 20½” squares
MOD:
Follow materials needed, cutting and piecing
directions below to make two 21½” liner units.
+-+-+-+-+-+-+-+-+-+-+-+-+-+-+-+-+-+-+-+-+-+-+-+
MATERIALS:
6 RED PRINT layer cakes/10″ squares (for bag)
7 BLUE PRINT layer cakes/10″ squares (for bag)
8 TAN PRINT layer cakes/10″ squares (for bag)
10 ASSORTED PRINT layer cakes/10″ squares (for liner)
⅜ yard WHITE SOLID
½ yard TAN PRINT
25 x 25″ BATTING (I used Warm & White)
CUTTING:
From 6 RED PRINT layer cakes/10″ squares, cut:
24) 3½” squares
From 7 BLUE PRINT layer cakes/10″ squares, cut:
26) 3½” squares
From 8 TAN PRINT layer cakes/10″ squares, cut:
16) 3½” squares
8) 3⅞” squares - cut diagonally once
1) 4¼” square - cut diagonally twice
From ⅜ yard WHITE SOLID, cut:
16) 3½” squares
8) 3⅞” squares - cut diagonally once
1) 4¼” square - cut diagonally twice
ASSEMBLY:
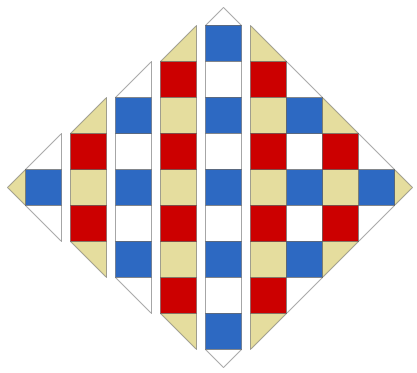
Assemble pieces as per illustration to make outer bag unit. Make 2.
I quilted in-the-ditch directly on to my batting (with no backing), and then trimmed off excess batting.

LINING
Cut:
8) 10″ squares
8) 10″ x 2½” strips
2) 2½ squares from left over scraps
Make 2 “9-patch” units (as per photo).

A modification from the original pattern, I made the strap shorter so it’s “invisible” and tucked in quietly inside the casing. Just enough room from grabbing as you fill your bag.

Uff da!


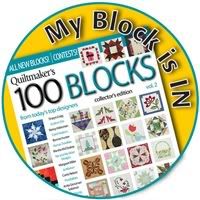 Quiltmaker has all sorts of celebratory goodness goin’ on - so be sure to check out their 100 Blocks Blog Tour with all the other blockmakers.


 Farting around with needle & thread and then blogging about it.