leftHOMEABOUTFABRICPROJECTSIN PRINTtwitterflickrfacebookPinterestright

Archive for 2007

WOW! I’m so feelin’ the love!

Monday, May 7th, 2007

WOW… you guys are awesome! I can’t tell you how happy and special you all make me feel with your sweet, sweet comments! I had no idea little ole me would get so many comments, and such sweet comments at that! I heart you all!

Because I was not expecting sooooooooo many comments… I’m going to add one day to my give-away and I’m going to add one more bundle (4 fat quarters and a panel of Wash Tub Butterflies)! So we’ll have two winners! Even though technically I’m the winner! My trusty personal assistant Bob will be blindfolded and draw two names. Please do not attempt to schmooze him (even though he is easily charmed). I will have my eye on him during the drawing at all times.

I heart you all and want to personally respond to each and every one of you. I cherish each comment and plan on getting to my email box soon!


Happy Zombiversary!

Friday, May 4th, 2007

I’m a few days late, as it was the 1st anniversary of Happy Zombie on May 1st. What started out as Cheese Zombie, a blog of stuff, rants, observations, blah, blah, blah… not much fun and didn’t make me happy. And then, one happy day on May 1st, 2006… I discovered crafty blogs and I KNEW that was for me. And Happy Zombie was born. Still not potty trained - but a year old!

I celebrate because I’ve made bloggy friends IRL, online bloggy friends and bloggy friends who I want to meet IRL. All because of commenting in this crafty-blogging-loveland. I’ve been inspired, I’ve been moved, I’ve been touched, I’ve been flattered… it just goes on and on. Every one of you (and some I’ve yet still to discover, so comment please) has brought happiness and inspiration into my life. For fear of leaving someone out who’s impacted my life, please clicky clicky in my blogroll (The Lunch Box) to visit the bloggers who inspire and enrich my life.

To celebrate my blogiversary, one lucky commentor will receive from me a bundle of Wash Tub Prints. If this is what it takes to de-lurk you… so be it! HA! I am giving away something very special to me. The fabric designer of the Wash Tub Prints is my good friend Karen (my sister-friend) and I love to brag about her and all her successes. A little bit of me is in this fabric in the form of words. If you look at the panel print, you will see “All the days of the week, A happy life I shall keep“. Yup… that was “authored” by moi. It was tweaked a bit, as originally I penned it “Every day of the week, a happy home I shall keep“. So there you have it - the closest I’ll ever become to being a fabric designer. A bit of me to one of you. Please leave a comment and on the 8th of May (which is one week and one day after my Zombiversary) I will draw one lucky name.   UPDATED:  Changed to the 9th of May.

Hearts and crafts,
Monica :)


Mimi goes shopping

Tuesday, May 1st, 2007

As promised, I took Mimi to Redwork Club and some shopping fun at Anna Lena’s. She had fun!!! Maybe it was a bit too much fun, as she got a bit cranky when it was time leave. I don’t know if it was all the sugar she consumed, or if it was a fabric high she was on. Anyhoo, I’ll let Mimi tell her story…

Going to Redwork Club was a blast! I got so much attention at Show & Tell time - I was a rock star! I got to meet Mum’s talented and creative friends and got to see all the pretty things they’ve made. What a fun group of ladies they are! A special treat… I got to meet my Great Auntie E and I can see why my mum loves her so much. Great Auntie E is mum to my cousin Mimi Mae. That’s right… she is mum to my cousin! I was hoping to meet Mimi Mae, but that will have to be another day.

Great Auntie Happy (yes… that’s really her name - how cool is that!) brought along her little baby and she and I became fast friends. She’s not really a little baby as she’s about 50 years old. I guess we really DO shrink as we get older! I was disappointed that Happy’s BFF Mary wasn’t there, as I wanted to meet her and her new baby Mimi Lou too (OMG… I have yet ANOTHER cousin!). WOW… what a week. Not only do I have two new cousins here on the coast, but my sister Sophie made her debut AND I found out I have a kiwi cousin Blossom down under!

Time to go shopping! How handy to have shopping carts in the store! I’m guessing Aunt Karen had them especially for my visit. Though it was kind of dangerous as I was not strapped in. I must admit, I was a little dizzy from the sheer bliss and excitement of seeing so much yummy fabric, especially all the 30’s! Wow… it’s 30’s heaven here! Ok, NOW I understand why Mum wears $3 t-shirts and $15 jeans… so she can spend all her money here instead! And wow… look at that bundle of Moda Cherries Jubilee I scored. Ahem… Mum scored. Say… that fabric looks familiar. Where have I seen it before??? ;)

Toys and toys and toys and toys! And books! And stamps! And more toys, oh my. I’m so curious, ha!

Oh SEW pretty! I got to snuggle up with Darlene’s new fabric line!

And then I got to bask in the glow in some of Auntie Karen’s creations!

All this shopping… I’m starting to get hungry. OMG… Peas & Carrots. Oh so, so, so, soooooooooooo yummy! I want to feast on these!

I have a sweet tooth now. Holy crap, there’s not only fabric… but there’s fudge here too! I wonder if anyone will notice if I slip behind the fudge counter and take a little nibble…

And now I must nap.

Napping in the splendor of Auntie Karen’s Wash Tub Prints. Sigh. Bliss. Um… this fabric feels kinda warm. Oooops. Mum forgot that I need Pampers at nap-time.

Hearts and Crafts,
Mimi


Birdapalooza

Sunday, April 29th, 2007

For two days our yard was inundated with these little birds. No exaggeration… there must have been close to 200 of these little feathered friends. At first it was cool… and then creepy thoughts of Alfred Hitchcook set in. I think they were looking for the Chicken Lady.

They were everywhere. A sea of birds. They even went into the chicken coop (to much of the amusement of the hens). They came, they went… and they left thousands of tiny little reminders behind. I know nothing about these birds. If anyone knows anything about these little guys… I’d love to know about them!

Talk about an E-Ticket for Mr. Mochi. For two days I got the Look of Death from him because I strictly enforce the indoor cat rule. I know he’s planning on sabotaging my fabric stash and leaving a nice coat of fur on it. He had that look in his eyes…


Sticker love

Friday, April 27th, 2007

And so it begins. Sticker love.
Vroom... vrooooom


Mimi Kicks Stash - Part IV (Fin)

Friday, April 20th, 2007

Blocks done? Setting joined? Now all that’s left are the borders. Compleatly optional of course. It’s all up to you.

This is just my personal preference, and it always depends on the quilt itself… but in most cases I like a skinny inner border and a chubby outer border. In keeping with many traditional quilts from the 1930’s, I like to throw in a solid fabric somewhere in my quilt.

Many times I use a solid for the skinny inner border, for to me it makes the quilt snap, crackle and pop - and seperates the quilt center from the outer border. This is just personal preference, and you may want to do it differently. Individuality is always encourged!

Did you make a Little Quilt? Did you make a Table Runner? Below are setting and border instructions for both, and as well… what’s needed for your backing, batting and binding for each option. If you rather… I have made the pattern into a PDF. It’s kind of a chunky download (6.1 MB’s) so it make take a minute or two to D/L. My gift to you. Please reciprocate and do not reproduce, copy, distribute or sell this pattern. This pattern is intended for your sole personal use or as a get-together project with your quilty and crafty friends. Thank you from the top and bottom of my heart! And Mimi’s too of course. :)

SETTINGS & BORDERS for LITTLE QUILT
26” x 32” Finished

Red Inner Border
cut 2) 24½” x 1½”
cut 2) 20½” x 1½”

Pink Print Outer Border
cut 4) 26½” x 3½”

1) Arrange blocks into a 3 x 4 grid. Twist and turn blocks for desired “pattern”.
2) Sew together blocks in each row. Alternate pressing direction for each row.
3) Sew together rows to make quilt center. Quilt center should measure at 18½” x 24½”.
4) INNER BORDERS: Sew long (red) inner border strips to the quilt center’s long sides. Sew
short (red) inner border strips to remaining edges (top and bottom). Press all seams toward border.
5) OUTER BORDERS: Sew long (pink print) outer border strips to the quilt’s long sides. Sew
short (pink print) outer border strips to remaining edges (top and bottom). Press all seams toward outer border.

SETTINGS & BORDERS for TABLE RUNNER
20” x 44” Finished

Red Inner Border
cut 2) 36½” x 1½”
cut 2) 14½” x 1½”

Pink Print Outer Border
cut 2) 38½” x 3½”
cut 2) 20½” x 3½”

1) Arrange blocks into a 2 x 6 grid. Twist and turn blocks for desired “pattern”.
2) Sew together blocks in each row. Alternate pressing direction for each row.
3) Sew together rows to make quilt center. Quilt center should measure at 12½” x 36½”.
4) INNER BORDERS: Sew long (red) inner border strips to the quilt center’s long sides. Sew short (red) inner border strips to remaining edges (top and bottom). Press all seams toward border.
5) OUTER BORDERS: Sew long (pink print) outer border strips to the quilt’s long sides. Sew short (pink print) outer border strips to remaining edges (top and bottom). Press all seams toward outer border.

Finishing your Little Quilt or Table Runner
1)
Layer your quilt top, batting and backing. Batting and backing sizes should extend at least 2” beyond the edge of your quilt top.
Little Quilt: 30” x 36” batting & backing
Table Runner: 24” x 48” batting & backing
2) Baste or pin layers. Quilt as desired.
3) Bind using a coordinating fabric with your favorite binding method.
Little Quilt: 3) 2½” strips for binding (40-44” WOF)
Table Runner: 4) 2½” strips for binding (40-44” WOF)

I have decided my Table Runner was going to be a wall hanging. I have a long narrow empty space about between my ironing counter and and my cupboards. I’ve added cherries to my big white spaces by fusing (with Heat & Bond Lite) and hand enbroidered button hole stitched them in place and the stems I embroidered.

I have put my cherry illustration on the PDF version of this pattern if you’d like to use it too.

The quality is not that good in this layout photo. It was cloudy when I snapped it, and no ammount of tweaking in PhotoShop was going to help this puppy.

And now I must nap. Oh wait. There’s a note on the fridge from Mimi (she’s learned quick that I’m at the fridge a lot)…

Dear Mum,

NOW will you let me get some new fabrics??? Blah, blah, blah… Anna Lena Schmana Lena… blah, blah, blah. All you ever talk about. As far as I’m concerned - you could have made this place up. After your nap, and if I promise to behave… will you take me there?

Mimi Kicks Stash Quilt-A-Long
[PART I] [PART II] [PART III] [PART IV] [flickr]


OMG x 325 = Wow!

Wednesday, April 18th, 2007

OMG… I’ve been saying that a lot lately. I mean a LOT. OMG, OMG, OMG! So much good stuff that I can’t stop myself from saying it. I’ve been saying OMG even more then my latest word addiction… “My Friend”, thanks to Myrna and Schmyrna. Though the later is in humor and mocking.

My first plethora of OMG’s came in the mail from PamKittyMorning. A little surprise. A surprise to me, and a surprise to Pam (she said she forgot what she sent me. Yup… she’s my Wonder Twin alright!). Way back when, Pam had made a post about something. Something, something, blah, blah, blah… I couldn’t read the words because I couldn’t take my eyes off the cute kitty bowl she had in the post’s photo. I commented on how much I loved her bowl and how cute I thought it was and blah, blah, blah… POOF… she sends me my own little bowl! A bowl of my own with a darling little monkey (that’s now become my Official PamKittyMorning Fan Club Mascot). The other members have their own animal mascots too. The monkey is now mine. Now all I need is to fill it with the Official Snack Food of Happy Zombie & PKM… Cheeze-It’s. And check out the darling HK Easter egg filled with goodies. Um, WERE filled with goodies.

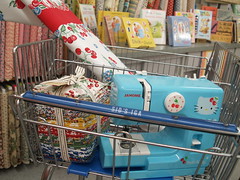
Note to Pam if you’re reading this…. OMG, your car is so cute!

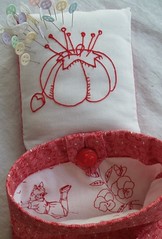
My friend Robin, who is an avid blogger without a blog (sounds so much better then Lurker, eh), gave me this adorable pincushion slash tread catcher that she made. Robin and I are in the same Redwork Club at Anna Lena’s. Each month we take turns designing/showing a project. When it was Robin’s turn, she showed us this way cool pincushion slash thread catcher she made (and instructions). Again, I went on and on how cute it was… and the next thing I know - Robin gives it to me! Though, Robin did say it was for Mimi. Ok, for Mimi I guess. Mimi, Mimi, Mimi. I’m starting to develope a Jan Brady complex. The cute little redwork design she got from jensensvacandsew.com.

Note to Robin if you’re reading this… that huge stack of vintage 30’s quilts you have are so cute!

My friend Connie (aka BLOP), another avid blogger without a blog (but is a big commentor), went to Arizona and soaked up some of that, um, what’s it called… oh yes, sun! Mz Blop and Mr Blop went to AZ to get some sun and visit family.

Connie is ALWAYS thinking of someone other then herself, and being on her trip was no different. Connie went to some big quilt show and found some yummy red and aqua goodies for me. It was like as if I went to the show with her - but I was too drunk to remember anything. And if her little Arizona goodies weren’t enough… Connie gave me THE FUNNIEST BOOK EVER!

My friend Karen went to Hawai’i and all I got was a lousy pair of $3 flip flops. Ok, not really. Not lousy and it’s actually an entire big bag of flip flops that I asked her to pick up for me (my faves and the only ones I’ll wear - Locals brand rubbah slippahs).

Karen gave Connie and me each a little handmade Hawaiian quilt clutch. Connie picked yellow, and I picked blue. It’s adorable and am thinking it might be perfect for my cell phone. Having Karen think of us while she was in Hawai’i was like us being there with her. But again… too drunk to remember anything.

Today was a big day at my front door. First the FedEx man (he’s SOOO nice BTW) and then our USPS lady (she’s also really nice). Though I often wonder if my UPS guy, the FedEx man and USPS lady meet over coffee and discuss what’s up with all these packages coming and going at Casa de Zombie.

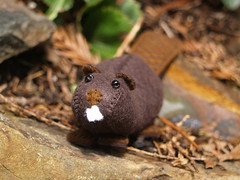
Anyhoo… An unexpected surprise from the super talented and creative Laurie of Old School Acres! I could barely contain myself as I ripped open the package. OMG, OMG, OMG… Laurie, Queen of the Softies… sending ME a package! And there is it, the little softie beaver I had fallen in love with on her blog. Do I even need to say at this point that I commented on her post on how cute I thought it was??? And loving and living in Oregon, I loved this little beaver all the more! You really need to click on the photo to see how cute it is and all the detail and expertise Laurie put into this. My new little friend needs a name. She’s sweet, she’s cute, she’s made with love. All she needs is a name. Suggestions?

The motherload of Rico Swappy love… I get this. I joined the First Aid Swap over at Missy’s Crafty Carnival. Missy partners me up with Amy of Peptogirl, and says to me how nice Amy is. I’m already feeling lucky with Missy’s endorsement! Amy and I chatted a bit and I could tell right away that Missy was right (though I never doubted her)… Amy was so nice. And it’s so nice and comforting when you have a good communication with your swap partner.

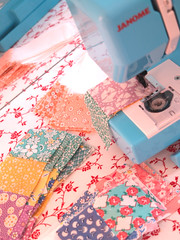
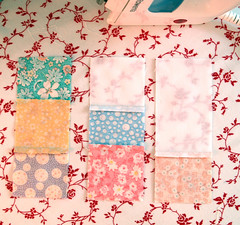
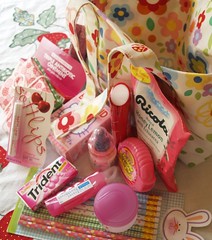
So before I get to the motherload, this is what I sent to Amy. Just a simple little first aid kit (a purse I made with her faves of polka dots and pink), which evolved into a travel kit which evolved into an emergency snack kit (and my favorite coffee from Astoria - Thundermuck). It was fun putting this together for Amy, especially fun to shop for pink stuff!

And now… the motherload.

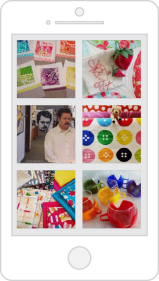
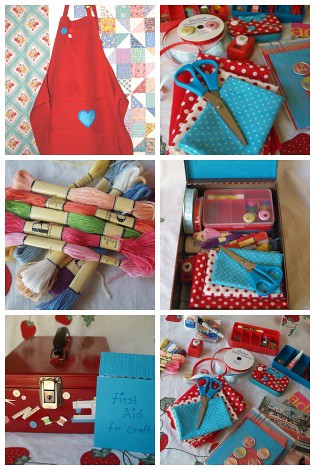
OMG, OMG, OMG! And it’s not so much WHAT was in the box… but WHAT Amy did. So much thought, so much kindness, so much generosity, SO MUCH STINKIN’ CUTE stuff! You can click on this mosaic and see all the photos.

I could write for hours with all Amy put into this, but I want you to visit her blog and read her nice write up about all she did. I’m gushing. Just gushing! Thank you Amy! And PS… I’m SOOOO subscribing to Adorn magazine! I had never even heard of it until now. I love that title… “Adorn - The crafty girl’s guide to embellishing life”.

Thank you all! I feel so loved. And now I must nap.
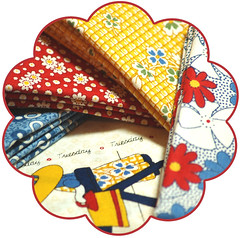
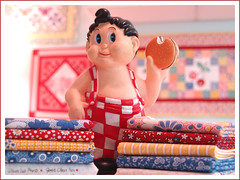


Mimi Kicks Stash - Part III

Wednesday, April 18th, 2007

Have you made your 12 blocks? Now it’s time to have some fun and play with your layout! By twisting and turning your blocks, a little quilt magic happens. It’s up to you to decide what layout you like best. This is where making six blocks one way, and making six blocks with a 3-print unit flipped the other way comes into play. If your blocks are all using the same colors or fabrics and you had not done “the flip”, there would be same colors or same fabrics “touching” each other in some of the layout options (and then you’d have to deal with quilt cootie’s). Without giving too much away with Mimi’s little mystery… shhhhh - this little quilt will eventually finish at 26” x 32”.

To see a larger design wall image:
Sample #1
, Sample #2, and Sample #3.

Assemble Blocks for Little Quilt center:
1) Arrange blocks into a 3 x 4 grid. Twist and turn blocks for desired “pattern”.
2) Sew together blocks in each row. Alternate pressing direction for each row.
3) Sew together rows to make quilt’s center. Quilt center at this point should measure at 18½” x 24½”.

But wait. There’s more…

Another option is to make a table runner or a door hanging… or just a long quilt for tall and skinny little dollies. Whatever Mimi… make me do more work. Though I’m not going to tell Mimi this (and let it go to her head) - I’m thinking I’m going to use her idea and make a table runner too. And keeping this on the sly, the table runner will eventually finish at 20” x 44”.

To see a larger design wall image:
Sample #4 and Sample #5.

Assemble Blocks for Table Runner center:
1) Arrange blocks into a 2 x 6 grid. Twist and turn blocks for desired “pattern”.
2) Sew together blocks in each row. Alternate pressing direction for each row.
3) Sew together rows to make quilt’s center. Quilt center at this point should measure at 12½” x 36½”.

One more installment of Mimi’s Quilt-A-Long to come soon! Remember… no time limit, no deadline, nothing to mail. Just fun. Show us your progress in our flickr group… from fabric selection to blocks to our finished project. All are fun and inspiring to look at!

Are you new to quilting or have never quilted before? You want to learn or improve? The BEST place to start is by taking a beginning quilting class at your local quilt shop. OR… find a very, very good friend or relative who quilts to teach you. Another option is to be “self taught” with the aid of the internet, books and magazines. If anyone has some good online resources, please feel free to post them in a comment.

My favorite Quilting Resources
Books:
- Bundles of Fun by Karen Snyder
- Quilting: The Complete Guide by Darlene Zimmerman
- Quilts! Quilts!! Quilts!!! : The Complete Guide to Quiltmaking by Diana McClun and Laura Nownes

Magazines:
- Better Homes and Gardens American Patchwork & Quilting
- Better Homes and Gardens Quilts & More (especially the Summer 2007 issue ;-)

Mimi Kicks Stash Quilt-A-Long
[PART I] [PART II] [PART III] [PART IV] [flickr]


Mimi Kicks Stash - Part II

Monday, April 16th, 2007

Well Mimi is back to her sunshiny self again and eager to start on her first project. Gotta love that nap-time! We’re putting that whole Mimi-gone-wild rotary cutting incident behind us and starting fresh. Fabric… piecing… bliss.

Mimi is so excited to have friends quilt-a-long with her, that she’s asked me to start a Quilt-A-Long flickr group for this project. Actually, she’s over my shoulder watching me type and wants to speak for herself…

I do so hope you want to come out and play with me! I can’t crochet. I can’t knit. I can’t cook. But… I can sew. And I will. So since this is my first quilt, it’s going to be a small one - and I’m thinking it should be quick to make too. I’m using Mum’s stash for this project - only because she said I couldn’t get new fabrics until I used some of the old ones. Yeesh. Ok, whatever.

Anyhoo… my mum promised she’d start me a flickr group so we can see, and oooh, and ahhh… and be inspired from each other’s little Quilt-A-Long quilts. I think it would be really cool to see what kinds of fabrics are used and how this little quilt finishes… especially if one decides to make modifications or be different (how cool would that be!). I’ll let Mum type again. I think she’s got more instructions. Blah, blah, blah.

Make twelve units of each three different fabric combinations:

- Three 2½” square prints

- Two 2½” square prints, one 2½” solid/white square

- One 2½” square print, one 2½” x 4½” solid/white rectangle

Note: All seams are ¼” for entire project.

Make twelve 9-Patches:

At this point you will have a total of 36) units that measure at 2½” x 6½”. Now you will take your units to make them into 12) 9-patches.

Before you start sewing, you may want to click on this photo to better see the pressing direction so your pieces nest nicely. You don’t need a good bra for nice sharps points… just good pressing.

If you’ve gone chop suey and sewed your prints randomly, you can skip this part. If you’ve sewn your colors in all the same spot for each block, you will want to then make 6) blocks one way, and the other 6) blocks with a rotatation of your three-print unit (example: yellow/green/purple fabric in photo). Just a little something that will come into play later on. I guess you just have to wait to find out why! Your 9-patch blocks will measure at 6½” (unfinished).

Mimi Kicks Stash Quilt-A-Long
[PART I] [PART II] [PART III] [PART IV] [flickr]


Mimi Kicks Stash - Part I

Saturday, April 14th, 2007

Mimi has been feeling a bit neglected lately… time for some quilting and kickin’ some stash. Mimi’s taking a stab at making her own little quilt using fabric from my stash. I may help her along just a little, as she’s quite fumbly with a ruler and rotary cutter.

Would you like to use what you have and play along too? To start, you will need:

Kona White or Kona Snow*,
cut into 12) 2½” squares
and 12) 2½” x 4½” rectangles

Six assorted colors,
cut each color into 12) 2½” squares
(for a total of 72)

-OR-

Assorted fabrics and/or colors
cut each into 2½” squares
(for a total of 72)

Ooops… Mimi’s getting a little cranky and going wild with the rotary cutter. Maybe all that stash was a bit too much for her. This could only mean one thing - she needs a nap. More to come after nap-time.

Notes from Mum… *My favorite white and off white fabric is Kona Snow and Kona White by Robert Kaufman I only list it because I LOVE it and won’t substitute anything else for it. All of the Kona solids for that matter. If you’ve never used it… give it a try. I promise, you WILL LOVE IT! I do ALL of my redwork on Kona Snow as well.

Mimi Kicks Stash Quilt-A-Long
[PART I] [PART II] [PART III] [PART IV] [flickr]


Farting around with needle & thread and then blogging about it.

Monica Solorio-Snow
Happy Zombie

Pacific Wonderland
Astoria, Oregon

This blog's content, photos and original graphics/artwork are copyrighted. Please do not use, copy, reproduce or distribute. All projects are strictly for personal/non-commercial use only. © 2006-2016

Instagram Twitter Pinterest
bloglovin Flickr I <3 Oregon
I <3 California Vine Facebook


Visit my shop for the
CHICKEN & STARS PDF quilt pattern!
CHICKEN & STARS - PDF quilt pattern

Visit my shop for the
PATIO PDF quilt pattern!
Patio - PDF quilt pattern

Visit my shop for the STRAWBERRY
DELIGHT needlebook template PDF!
STRAWBERRY DELIGHT - needlebook template PDF

Visit my shop for the POOCHIE BAG
PDF sewing pattern!
Poochie Bag - PDF sewing pattern

Visit my shop for the
SPRINKLE PDF quilt pattern!
SPRINKLE - PDF sewing pattern

Visit my shop for the
BADGE HOLDER PDF sewing pattern!
Badge Holder - PDF sewing pattern


HOME
About Me
My Instagram
My Bloglovin
My flickr
My twitter
My Pinterest
happy zombie
My studio
Eating Astoria
My Facebook

my shop
my shop

my instagram
my instagram

my twitter
my twitter

my flickr
my flickr


Sew Yummy!
July August 2014
Cloud9 Fabrics


Winterkist!
Summer 2012
OOP (past info)


happy mochi yum yum by monica solorio-snow
Spring/Summer 2011
OOP (past info)


Holiday Happy - The Fabric
Spring 2010
OOP (past info)


Make happy... make stuff


Published, in print and always in
my mom's shopping cart


Super-categorize me
  • Bake something
  • Bee serious
  • Do Something
  • Fabric Folding
  • Field Trip
  • Happy Mochi Yum Yum
  • Holiday Happy
  • How I Live
  • I Heart California
  • I Heart Oregon
  • La Familia
  • Make Something
  • Mimi Kicks Stash
  • Mimi’s Adventures
  • Quilt Market
  • Quilty n Crafty
  • Rico Swappy
  • Ron Swanson Along
  • Sew Yummy
  • So Stinkin’ Cute
  • Stuff
  • Stuff I like
  • Tiny Totes
  • Tips & Trix
  • Winterkist


  • I'm a girl with a past
  • 2016
  • 2015
  • 2014
  • 2013
  • 2012
  • 2011
  • 2010
  • 2009
  • 2008
  • 2007
  • 2006


  • Make + Share = Inspire
    Happy Zombie HQ
    Holiday Happy Pool
    The Walking Quilted
    Pennie Pocket Pool
    Poochie Bag Pool


    Links


    No, seriously.
    Do Something


    Holy shitballs - I went to QuiltCon


    Blog content, photos and original
    graphic images property of
    Happy Zombie/M. Solorio-Snow
    copyright © 2006 - 2015

    BLOG

    HOME