leftHOMEABOUTFABRICPROJECTSIN PRINTtwitterflickrfacebookPinterestright

"Quilty n Crafty" Archive


Mimi Kicks Stash - Part III

Wednesday, April 18th, 2007

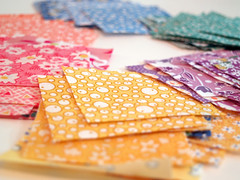
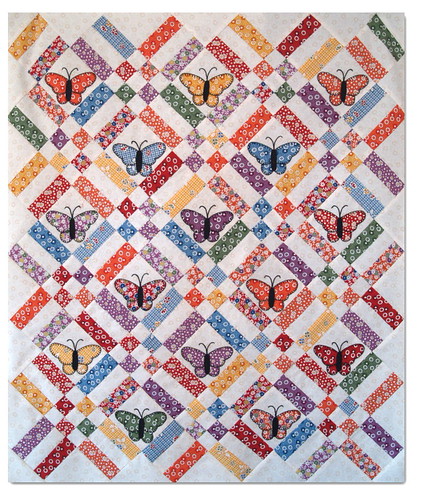
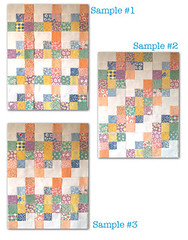
Have you made your 12 blocks? Now it’s time to have some fun and play with your layout! By twisting and turning your blocks, a little quilt magic happens. It’s up to you to decide what layout you like best. This is where making six blocks one way, and making six blocks with a 3-print unit flipped the other way comes into play. If your blocks are all using the same colors or fabrics and you had not done “the flip”, there would be same colors or same fabrics “touching” each other in some of the layout options (and then you’d have to deal with quilt cootie’s). Without giving too much away with Mimi’s little mystery… shhhhh - this little quilt will eventually finish at 26” x 32”.

To see a larger design wall image:
Sample #1
, Sample #2, and Sample #3.

Assemble Blocks for Little Quilt center:
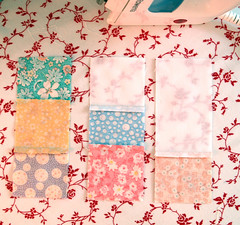
1) Arrange blocks into a 3 x 4 grid. Twist and turn blocks for desired “pattern”.
2) Sew together blocks in each row. Alternate pressing direction for each row.
3) Sew together rows to make quilt’s center. Quilt center at this point should measure at 18½” x 24½”.

But wait. There’s more…

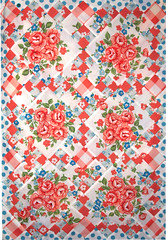
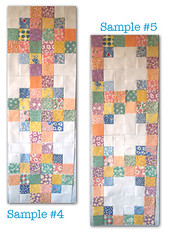
Another option is to make a table runner or a door hanging… or just a long quilt for tall and skinny little dollies. Whatever Mimi… make me do more work. Though I’m not going to tell Mimi this (and let it go to her head) - I’m thinking I’m going to use her idea and make a table runner too. And keeping this on the sly, the table runner will eventually finish at 20” x 44”.

To see a larger design wall image:
Sample #4 and Sample #5.

Assemble Blocks for Table Runner center:
1) Arrange blocks into a 2 x 6 grid. Twist and turn blocks for desired “pattern”.
2) Sew together blocks in each row. Alternate pressing direction for each row.
3) Sew together rows to make quilt’s center. Quilt center at this point should measure at 12½” x 36½”.

One more installment of Mimi’s Quilt-A-Long to come soon! Remember… no time limit, no deadline, nothing to mail. Just fun. Show us your progress in our flickr group… from fabric selection to blocks to our finished project. All are fun and inspiring to look at!

Are you new to quilting or have never quilted before? You want to learn or improve? The BEST place to start is by taking a beginning quilting class at your local quilt shop. OR… find a very, very good friend or relative who quilts to teach you. Another option is to be “self taught” with the aid of the internet, books and magazines. If anyone has some good online resources, please feel free to post them in a comment.

My favorite Quilting Resources
Books:
- Bundles of Fun by Karen Snyder
- Quilting: The Complete Guide by Darlene Zimmerman
- Quilts! Quilts!! Quilts!!! : The Complete Guide to Quiltmaking by Diana McClun and Laura Nownes

Magazines:
- Better Homes and Gardens American Patchwork & Quilting
- Better Homes and Gardens Quilts & More (especially the Summer 2007 issue ;-)

Mimi Kicks Stash Quilt-A-Long
[PART I] [PART II] [PART III] [PART IV] [flickr]


Mimi Kicks Stash - Part II

Monday, April 16th, 2007

Well Mimi is back to her sunshiny self again and eager to start on her first project. Gotta love that nap-time! We’re putting that whole Mimi-gone-wild rotary cutting incident behind us and starting fresh. Fabric… piecing… bliss.

Mimi is so excited to have friends quilt-a-long with her, that she’s asked me to start a Quilt-A-Long flickr group for this project. Actually, she’s over my shoulder watching me type and wants to speak for herself…

I do so hope you want to come out and play with me! I can’t crochet. I can’t knit. I can’t cook. But… I can sew. And I will. So since this is my first quilt, it’s going to be a small one - and I’m thinking it should be quick to make too. I’m using Mum’s stash for this project - only because she said I couldn’t get new fabrics until I used some of the old ones. Yeesh. Ok, whatever.

Anyhoo… my mum promised she’d start me a flickr group so we can see, and oooh, and ahhh… and be inspired from each other’s little Quilt-A-Long quilts. I think it would be really cool to see what kinds of fabrics are used and how this little quilt finishes… especially if one decides to make modifications or be different (how cool would that be!). I’ll let Mum type again. I think she’s got more instructions. Blah, blah, blah.

Make twelve units of each three different fabric combinations:

- Three 2½” square prints

- Two 2½” square prints, one 2½” solid/white square

- One 2½” square print, one 2½” x 4½” solid/white rectangle

Note: All seams are ¼” for entire project.

Make twelve 9-Patches:

At this point you will have a total of 36) units that measure at 2½” x 6½”. Now you will take your units to make them into 12) 9-patches.

Before you start sewing, you may want to click on this photo to better see the pressing direction so your pieces nest nicely. You don’t need a good bra for nice sharps points… just good pressing.

If you’ve gone chop suey and sewed your prints randomly, you can skip this part. If you’ve sewn your colors in all the same spot for each block, you will want to then make 6) blocks one way, and the other 6) blocks with a rotatation of your three-print unit (example: yellow/green/purple fabric in photo). Just a little something that will come into play later on. I guess you just have to wait to find out why! Your 9-patch blocks will measure at 6½” (unfinished).

Mimi Kicks Stash Quilt-A-Long
[PART I] [PART II] [PART III] [PART IV] [flickr]


Mimi Kicks Stash - Part I

Saturday, April 14th, 2007

Mimi has been feeling a bit neglected lately… time for some quilting and kickin’ some stash. Mimi’s taking a stab at making her own little quilt using fabric from my stash. I may help her along just a little, as she’s quite fumbly with a ruler and rotary cutter.

Would you like to use what you have and play along too? To start, you will need:

Kona White or Kona Snow*,
cut into 12) 2½” squares
and 12) 2½” x 4½” rectangles

Six assorted colors,
cut each color into 12) 2½” squares
(for a total of 72)

-OR-

Assorted fabrics and/or colors
cut each into 2½” squares
(for a total of 72)

Ooops… Mimi’s getting a little cranky and going wild with the rotary cutter. Maybe all that stash was a bit too much for her. This could only mean one thing - she needs a nap. More to come after nap-time.

Notes from Mum… *My favorite white and off white fabric is Kona Snow and Kona White by Robert Kaufman I only list it because I LOVE it and won’t substitute anything else for it. All of the Kona solids for that matter. If you’ve never used it… give it a try. I promise, you WILL LOVE IT! I do ALL of my redwork on Kona Snow as well.

Mimi Kicks Stash Quilt-A-Long
[PART I] [PART II] [PART III] [PART IV] [flickr]


High on the crafty crack again…

Wednesday, March 21st, 2007

Just when I think I’ve got a grip on my current projects coming to completion, there I go blogging and see the latest rage - Grannies. I don’t know how to crochet and couldn’t read those Einsteinishy instructions to save my life, and yarn is not my medium… but then… OMG… there, on Jenny’s blog were her grannies and I just got that crafting tingle when I saw them. There’s also a big Granny Along sweeping blogland (and OMG… you SHOULD SEE the grannies being made!).

I don’t even know if I’m making the grannies correctly - but what the heck, I’m on crafty crack! I picked my colors from my IKEA lamp and pillow. At first I was shy about using red with bright pink, but both those colors are in the lampshade/pillow - and you know, they work well together. Those Swede’s know what they are doing!

So far I’m having a lot fun with this and fun to do something out of my element, but I have to say for me I’m not hooked (pun intended, HA). I’m missing my fabric already. Dear sweet cotton love.

UPDATED: Those of you trying to resist… look away. Umm. You’re still reading this. LOOK AWAY! Ok, they’re not looking. Autum sent me a link to a GREAT tute at Crochet Cabana. THERE ARE PHOTOS and words! Looking at the instructions, I see I’ve been doing THREE things wrong, most important my error when changing colors. My new enlightenment is going to make this so much easier!

I’ve also been wanting to try that ripple stitch, and am so clueless on how to. I’ve googled tutes, but it’s been all Greek to me. Autum said she found videos on YouTube. I’m going to look for them and post them. Thank you Autum!

UPDATED, again: Here is what I found on YouTube. If anyone knows of more videos, I’ll be happy to post them here!


TSAB - Twins seperated at birth

Friday, March 9th, 2007

PKM sent me the most beautiful fabric (mailbox love), and unbeknownst to each other - were each making the same quilt from a little Japanese quilt book called “Square Patchwork”. Twins separated at birth. Check out PamKittyMorning to see her work of art!

If the fabic Pam sent me isn’t beautiful enough… look how it’s JUST MADE for the Hello Kitty sewing machine! A match made in heaven (or at least at Target and Windham fabrics). I think this little quilt will HAVE to be my new machine’s “blankie” when it comes. Oh yes… I’ve already adopted her from Target.com - last night as soon as I got home. Now I have to wait. And wait. And wait. I’m still thinking of a name for her. I’m leaning towards Mimi (HK’s twin sister - so few know about her and I think it’s high time she gets some props). That’s it… Mimi! Very fitting!


Fabric Folding - The Stashformation

Sunday, March 4th, 2007

On my fabric folding quest, the quest to be organized… all it was was a plan. A plan for some day. My first step was to get all my fabric out of their Rubbermaid prisons and into my cupboards. Well that was easy cheezy (sans now I have to put all those Rubbermaid’s into the attic). So here you have it. Cupboard #1. The proverbial “BEFORE” shot. It’s been this way for well over a week. I could use the excuse I’ve been bit by a nasty flu bug, and, well, you know… it’s just an excuse. I figured hey, it’s behind closed doors so it must be nice and neat.

All that changed after Autum showed me what she’s done! Right there in my email were two of the most amazing BEFORE and AFTER photos of Autum’s glorious fabric stash transformation - a stashformation! Thinking our email chat was going to be about the weather and Lost… WOWIE ZOWIE she lit my fire! One cupboard. I’ll start with one cupboard! So here it is, my first cupboard! I want to get more shelves, but for now my colors will have to stack as they are.

I have to say, this was fun. Not so much the process, but knowing the end result was going to be magical. That’s really dorky (I’m borrowing that from Autum too), but it really is an amazing result. I know because my little girl power group of friends (MoKaCoCo as we call ourselves… Me, Karen, Connie “blop” & Cortne’) recently spent a few fun filled days refolding my friend Karen’s fabric (who I learned this folding method from) in her new studio. I wish I could show off some photos, but Karen’s studio is going to be featured in a mag so it’s all hush-hush for now and I could be thrown in the slammer if I did. You’ll just have to take my word for it that you’ll be in a When Harry Met Sally moment when you see it!

By looking at the first two photos, it looks like there’s the same amount of fabric. Oh not so mon ami! Hidden in all those piles was not just yardage… but fat quarters too! Lots and lots of fat quarters! Anything over ⅓ yard got folded with the 6½” ruler, anything below that - fat quarters and large scraps got folded with the 3½” ruler and put into one of the floor cupboards (that supports my work table).

A game of hide and seek, and I was “it”… all the little teenie tiny scraps got tagged and corralled into a little basket. Too precious and too usable to chuck - but too small to organize. So in a basket they went. I still can’t believe I found all these little gems hiding in my stash.

This is just one cupboard, and I have like five or six more cupboards to go. I feel like I’m on my way to my own little cotton bliss. Just looking at my neat fabric feels like that feeling you get when you walk into a Crate & Barrel or the Container Store - everything is just so tidy, colorful and pretty that it screams HAPPY. To have that feeling with my own stash is really something. If you’re reading this and think I’m Cuckoo for Cocoa Puffs… well, you’re actually kinda right. BUT… if you give this a try, I promise you will love it. Come. Come and drink the fabric folding Kool-Aid. Start with say 10 pieces of fabric. Just ten. You’ll get to piece ten and you’ll say to yourself, “just a few more”. And so on, and so on, and so on…

Big gooey non-contagious-flu-bug-free smack of a kiss to Autum!


Fabric Folding

Monday, February 26th, 2007

This is the fabric folding method I used in my re-do (BTW, not quite yet a re-DONE… but I’m getting there!). Anyhoo… I’m not sure if this is the exact way Lois Hallock does it (I have her book… I guess it’s time I read the words instead of just looking at the pictures!). This is how I learned it from my friend Karen when we folded her fabric in her new studio (and Karen learned it from Lois). So here’s what I do:

1) Place folded yardage with selvedge to your left, the fold to your right. Line up your ruler on the fold. I use a 6½” ruler, but you can use what ever size you like. You can also let your shelf size/space dictate what size you want to make it.

2) Next just start rolling up. Flipping over and over until you get to the end. Let the ruler be your guide. It doesn’t have to be super tightly wound, but you don’t want it to slip and slide either.

3) When you reach the end, your last flap my need to be turned under just a bit. Kind of like how you do when you wrap something in tissue paper.

4) Slide out your ruler and now fold the folded end to the selvedge end. Stack your fabrics with the fold facing you. I use the same method with fatquarters, but with a skinnier ruler (I used a 3½” ruler). I let my shelves dictate how I was going to roll/fold my FQ’s, and rolled them on the 18” width of the fabric so they’d rest nicely on my narrow shelves.

My yardage cupboards have deeper shelves so finishing with an 10”/11” final unit worked perfect for me. If you don’t have a neat piece of yardage to begin with (and boy do I have a lot of those), just fiddle with your piece so you and up with a nice folded unit with now raw edges visible.

I hope I made sense of this! If you’re like me - the pictures tell the story and not the words. Drink the fabric folding Kool-aid… you won’t regret it!   Some before and after photos here.


Swappy Love & Mailbox Joy

Saturday, February 17th, 2007


My WONDERFUL potholder swap partner was Autum of Creative Little Daisy!

Before I say more about all the lovely things she made and sent me, I must tell you that we had no idea what each of us was sending each other. Autum told me her fave colors, and I told her mine. Our packages to each other were literally two ships passing in the night (more like two USPS trucks rambling down the highway in the wee hours of the morning). So as it turns out, each of us had made the other two potholders (you can see we’re not blog-law abiding citizens and broke the rule of sending ONE potholder)! In my case, I couldn’t decide which one to send her, so I sent her both. In Autum’s case, she not only sent me two… but she made this darling crafting apron too! OMG… I love what she made me and her workmanship is so beautiful and skillful! The potholder has a darling 30’s looking teakettle that she embroidered AND it has one of Autum’s signature yo-yos! It’s JUST DARLING!

The ovenmit I just love too, and no way am I going to let food goop get on it. I’m thinking of hanging it on the wall and popping some of my vintage enamal spoons in it. And the pot holder I think I will use, but for only something sweet like serving tea to my friends. Who am I kidding… I’ll be serving wine! But I may serve tea just because!

And if that wasn’t enough… there was more! Autum sent me four fabrics, all beautiful and all something I myself would pick out! All these fabrics are delicious! I don’t know if I watch too much TV (watching shows like Lost and Hereos), but I’m convinced Autum has a super hero power and can read my mind! What did I send Autum? You guessed it… four little swatches of fabric (or as Autum calls it… “yo-yo ammo”! Wild, eh!

Of course the icing on the cake was how Autum wrapped it all up. She did EXACTLY how I did it (but bigger and better). White tissue wrapped and tied with ric-rac. Is that not too wild! Autum also used the darling daisy trim (I love, love, love daisies) and a generous amount of red/white floss I had never seen or heard of (but instantly fell in love with) called “baker’s twine”.

Everything Autum made - made me smile and I’m feeling so blessed. Not blessed because I scored (and boy did I score!)… but because such a beautiful person did such beautiful things for me! Thank you Autum!


WIP-slashed

Thursday, February 1st, 2007

AL_butterfly

I finished my little shop quilt WIP, and I have to say… it was so much fun making it I kind of hated to finish it. Sort of. I’m always happy when a shop quilt is done and I can turn it in. It’s one thing to put my stuff off, but I can’t do that with someone else’s stuff especially sister friend Karen!

I did change the butterfly that came with the pattern into an “Anna Lena butterfly”. Karen did the beautiful machine quilting (maybe you can see it in the second photo)… and all the beautiful fabrics are from Karen’s Wash Tub fabric line. It’s hard to see in a photo, but with these vibrant 30’s fabrics it looks like candy on a quilt IRL.

It’s not often I want to make a shop quilt a second time (or for me for that matter), but I think with this one I’m going to get a kit and make one for me too. How can I not… it’s so beautiful and packed with all that Snyder goodness!

Second photo used with permission from Anna Lena’s


Quilter’s Drool

Tuesday, January 30th, 2007

Have a napkin or bib ready… I was just at QuiltersBuzz and Gina has a really nice post about the recent Road to California Quilt Show. I wish I could have gone… next year for sure! Anyhoo… Gina has a link to the R2C winner’s gallery. Jaw drooping drop dead gorgeous drool inducing quilts. The quilts are the Manolo Blahnik’s and Prada’s of the quilting and textile world!


Farting around with needle & thread and then blogging about it.

Monica Solorio-Snow
Happy Zombie

Pacific Wonderland
Astoria, Oregon

This blog's content, photos and original graphics/artwork are copyrighted. Please do not use, copy, reproduce or distribute. All projects are strictly for personal/non-commercial use only. © 2006-2016

Instagram Twitter Pinterest
bloglovin Flickr I <3 Oregon
I <3 California Vine Facebook


Visit my shop for the
CHICKEN & STARS PDF quilt pattern!
CHICKEN & STARS - PDF quilt pattern

Visit my shop for the
PATIO PDF quilt pattern!
Patio - PDF quilt pattern

Visit my shop for the STRAWBERRY
DELIGHT needlebook template PDF!
STRAWBERRY DELIGHT - needlebook template PDF

Visit my shop for the POOCHIE BAG
PDF sewing pattern!
Poochie Bag - PDF sewing pattern

Visit my shop for the
SPRINKLE PDF quilt pattern!
SPRINKLE - PDF sewing pattern

Visit my shop for the
BADGE HOLDER PDF sewing pattern!
Badge Holder - PDF sewing pattern


HOME
About Me
My Instagram
My Bloglovin
My flickr
My twitter
My Pinterest
happy zombie
My studio
Eating Astoria
My Facebook

my shop
my shop

my instagram
my instagram

my twitter
my twitter

my flickr
my flickr


Sew Yummy!
July August 2014
Cloud9 Fabrics


Winterkist!
Summer 2012
OOP (past info)


happy mochi yum yum by monica solorio-snow
Spring/Summer 2011
OOP (past info)


Holiday Happy - The Fabric
Spring 2010
OOP (past info)


Make happy... make stuff


Published, in print and always in
my mom's shopping cart


Super-categorize me
  • Bake something
  • Bee serious
  • Do Something
  • Fabric Folding
  • Field Trip
  • Happy Mochi Yum Yum
  • Holiday Happy
  • How I Live
  • I Heart California
  • I Heart Oregon
  • La Familia
  • Make Something
  • Mimi Kicks Stash
  • Mimi’s Adventures
  • Quilt Market
  • Quilty n Crafty
  • Rico Swappy
  • Ron Swanson Along
  • Sew Yummy
  • So Stinkin’ Cute
  • Stuff
  • Stuff I like
  • Tiny Totes
  • Tips & Trix
  • Winterkist


  • I'm a girl with a past
  • 2016
  • 2015
  • 2014
  • 2013
  • 2012
  • 2011
  • 2010
  • 2009
  • 2008
  • 2007
  • 2006


  • Make + Share = Inspire
    Happy Zombie HQ
    Holiday Happy Pool
    The Walking Quilted
    Pennie Pocket Pool
    Poochie Bag Pool


    Links


    No, seriously.
    Do Something


    Holy shitballs - I went to QuiltCon


    Blog content, photos and original
    graphic images property of
    Happy Zombie/M. Solorio-Snow
    copyright © 2006 - 2015

    BLOG

    HOME