Square + Square = Magic Hourglass
January 10th, 2011
I’m sure every quilter has the same kindling and thrill I do - you see a square of fabric and it begs you to transform it into something new.
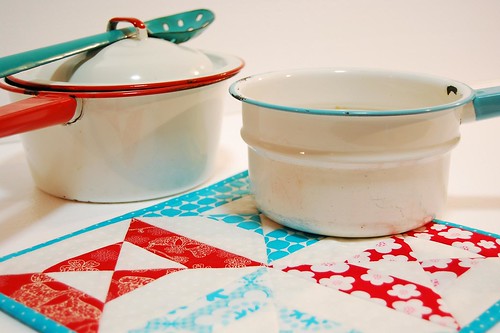
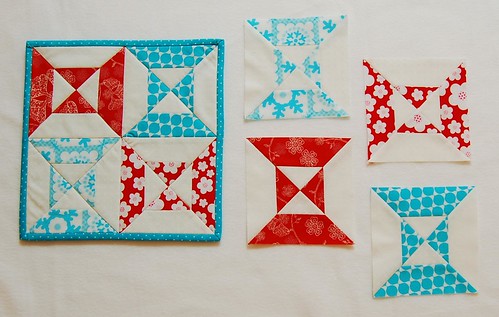
So I turned 2 squares into 1 hourglass. A magic hourglass. One square of a print, one square of background fabric. Any size square will work as long as two rules of thumb are followed (more on that ahead). For my potholder (which is headed to Heather’s new red & aqua rockin’ kitchen), I made four magic hourglasses starting with 5″ squares - and each one finishes at almost it’s original size no matter what the size of square you start with. All seams are ¼”.
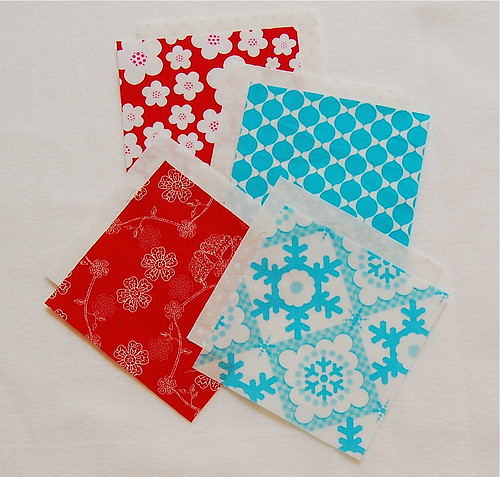
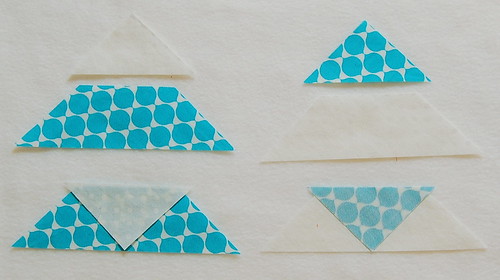
1) For each print square and background square - cut in half diagonally. Red fabric by Patty.
2) Cut each triangle in half long-wise. Rule of thumb #1: Find your half measurement. It does not have to be an exact half, but do use the measurement you’ve chosen consistently on all your blocks of that size. Aqua fabric by Mo.
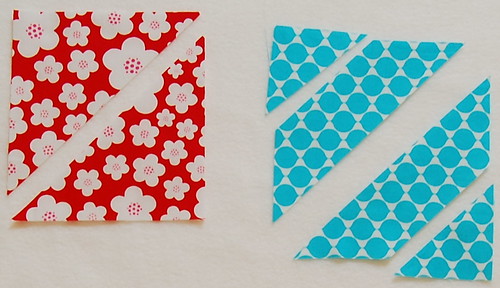
3) Trim ⅝” off (and toss) one end of the trapezoid. Rule of thumb #2 - this measurement is etched in stone and is used for every size block. Charm, Layer Cake… whatever size.
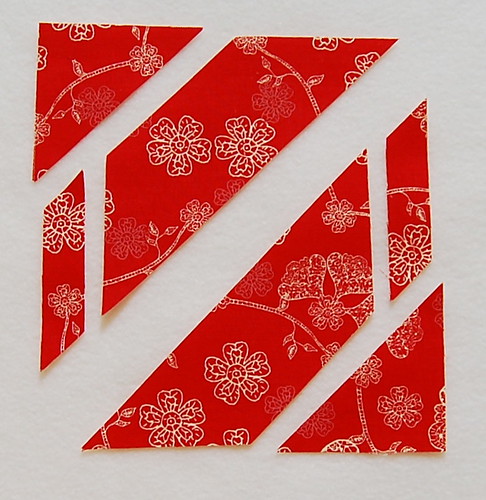
4) Join a background triangle to print trapezoid/print triangle to background trapezoid to make a triangle unit. Press to the print. Because you’re working with the motherload of bias edges, press gently with steam.
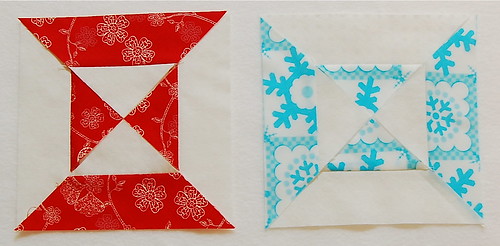
5) Audition triangle units - another option beside a double hourglass is to make a square-in-a-square-ish block (how cool is that!). Red fabric by Bari, aqua fabric by me.
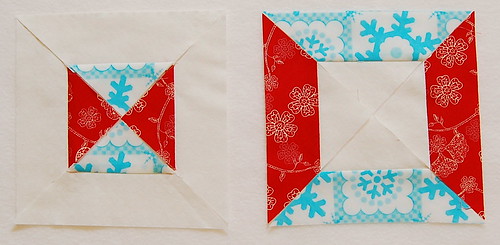
6) Join triangle units to make magic hourglass block.
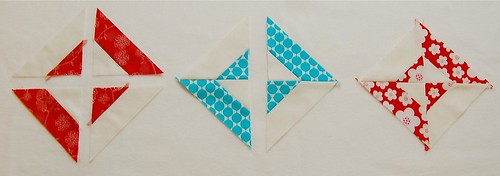
7) Trim of dog-ears, join blocks and make something.
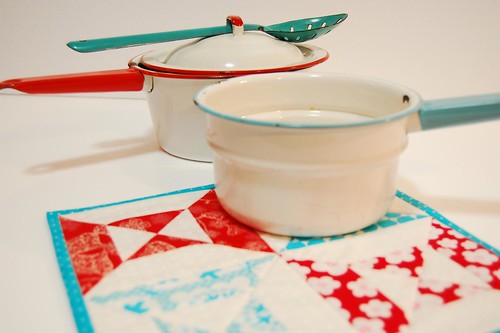
And now I will cook something. Hahahahaha - I kill me.
Posted in Make Something |
 Farting around with needle & thread and then blogging about it.











So fun! I can’t believe I haven’t tried these before. They are for sure on the [enormous] to-do list now!
January 10th, 2011Wow, I love it, I will have to give this a go. You make it look so easy. I will email pic when I get it done : ) Thanks for sharing.
January 10th, 2011OMG YRSFS. That is such a clever block. And wow, need to pin that cute pot and pan into my envy board. gotta go, pin ya later. xo
January 10th, 2011I absolutely LOVE this! Thanks for sharing!!
January 10th, 2011as we say affectionally in oz….you are such a dag!! :)
January 10th, 2011You finished it! Despite SHY distractions!
January 10th, 2011Hmmmm…do I see a ten-minute tute in your future?????
January 10th, 2011Love it! And once again you make it look easy, so why not have a go!
January 11th, 2011what a fun, easy way to make dhg blocks.
January 11th, 2011the last time i made this pattern i almost cried because of all the trimming, folding etc. (they were made of rectangles…ugh!).
looks fabulous!
Clever, as usual, Zombie!
January 11th, 2011And a belated Happy new year to you.
Hugs
xoc
Great pot holder!! She will love it!! Hmmm… were you cooking Chinese Take out?? Just curious.
January 11th, 2011Those colors are wonderful together!
January 11th, 2011I really love this…and I really want to try it. But I got a little queasy with the “set in stone” part and now I’m sure it won’t turn out right. I’ve never been good at numbers (…or measuring accurately). So, as usual, I’ll wing it. If you see a botched version posted somewhere around my neck of the blogosphere, please don’t take offense. :)
January 11th, 2011So sweet, or should I write…Sew Sweet! You started it. I think I will go cook something, too. :) ~Kelly
January 11th, 2011Thank you Monica! You have the best eye for color and come up with the cutest things to make!
Definitely will have to try this at the quilting retreat next weekend. Since I won’t risk getting it dirty (they do feed us), it’ll be the perfect time to try it.
January 11th, 2011Cute and a very nice tutorial as well. Now as well as the Go baby pam is making me get I’ll have to get a new laptop so i can consult this as I cut! Hmm…do they have a die for this, think I’ll go look!
January 11th, 2011This one is a keeper! And I love the colors:)
January 11th, 2011Very, very cute! Will we ever tire of red and aqua??? I think not.
January 11th, 2011don’t you just love it when creativity strikes and it works perfectly? Kudos!!
January 11th, 2011I would caution against cooking–something might get food on it and that leads to laundry. See? Double no-no.
This IS awesome - fun - smart - and you’ll find me making one SOON !!!
January 11th, 2011Very, very cool. And of course, the colors and pictures are just lovely.
January 11th, 2011This is beautiful, I just love these colors together! Thanks for the tutorial!
January 11th, 2011I love the happy vintage colors you used! They look perfect together!
Sherry @ A Happy Valentine
January 11th, 2011These are so cute! I am thinking a couple of these would make a cute mug rug!
January 11th, 2011This looks so easy and fun! Thanks so much! I can’t wait to try it out - wouldn’t a whole quilt of those be awesome!
January 11th, 2011Those are adorable! I love the fabric, too. Did you know that Karen is planning an aqua-and-red theme for her Christmas tree and packages in 2011? I’m thinking she should use this fabric for gift wrap!
January 11th, 2011You know…..frozen pizza counts as cooking ;-)
January 11th, 2011The block is amazing, but what is REALLY amazing, is you are going to cook something…you are soooo funny!! How on earth would you have time to cook when your brain is busy cooking up more quilting ideas!! I think you should write a “cook” book of ideas!!!! xxoxoxoxo
January 11th, 2011Oh that’s pretty. Should I try it?? What am I saying, of course I should try it! You do make it look easy, but I’m sure I can goof it up somehow! Cooking…oh Monica, you are funny!
January 11th, 2011Great pictures and great pattern Monica. Thanks for the bright spot in my evening!
January 11th, 2011I now know exactly what I’m going to do with some of the charm squares I won from you (which I have been hoarding)! Great tutorial, love the magic!
January 11th, 2011Besides this being a fabulous idea, you make me snort out loud with your comments. You kill me, too!
January 11th, 2011Oh, my gosh! How cute and easy you’ve made these blocks! I might even be brave enough to try one. Or two, or three….Thanks, Monica. :)
January 12th, 2011This is awesome Monica! I’m definitely going to be testing this block out!
January 12th, 2011What cute little blocks. Thanks for sharing the how to.
January 12th, 2011That tute is sooooo zombielicious! I am heading to my machine right now to make one or two or seven! Thanks. I will be expecting a tute a month now…no pressure…:-)
January 12th, 2011What a cool technique!! Thanks for the tutorial!
January 12th, 2011ooooooooo, ahhhhhhhh!! Love everything about this project…yummy colors!!
January 12th, 2011cute,lovely, wonderful, sweet….as usual. I wouldn’t expect anything else from my cute, lovely, wonderful, sweet friend. :)
January 13th, 2011Oh Monica, how amazing is that????
January 13th, 2011It looks great and you´ve done a fantastic job. And as always the colors…..love the combination!!!!
Ich wünsche dir einen schönen Tag und ganz liebe Grüße
Sabine xxx
You know, if you ever get tired of those blocks, or the dishes for that matter, feel free to send them my way.
I’m just sayin’.
;)
January 13th, 2011Pinterest made me miss this post..but then I saw the picture on Pinterest that brought me back here!! Aaaaaahhhh destiny. LOVE this!!! You rock mf! xo
January 13th, 2011Oh yes, a little transformation just brings a new look to your work! Love all the colors going on!
January 14th, 2011I LOVE IT!!! Thank you so much, Monica. It’s just too awesome to use as a pot holder, so I’m going to find the perfect spot to hang it. You’re the best!
January 16th, 2011Clever Girl!! I love it! They look sort of like thread spools to me.
January 16th, 2011You’re so funny. This is a darling project. I love little projects that I can make in an afternoon and feel so good about afterwards. Your little pans are so colorful. I love them.
January 17th, 2011Thanks so much for this awesome tutorial! I had some leftover charm squares and made a potholder. So easy! I’m thinking a layer cake would make a neat throw using this technique.
January 17th, 2011You made my day!
I love the colors in those and the pots are nice too. I just noticed the subtitle in your blog header and got a good laugh because thats how I feel about myself most of the time. :)
January 18th, 2011Okay, I may be missing something here since everyone else seems to have had no problem with this, but where is step 3? How do I know how big to cut that corner triangle? Is that an adjustable measurement or a fixed one? HELP!!!
=============
Ack! Thanks for pointing out I’m missing the number 3. The steps are all there - just miss numbered (I somehow skipped ahead in numbers and neglected poor number 3). Thanks bunches - and the number 3 thanks you too. :O)
January 21st, 2011Monica
Thank you for the tutorial, I can’t wait to give this a shot! I really love red and aqua together,too!
January 25th, 2011The colors are sooo cute! Thank you!
January 26th, 2011Thank you so much. This is great.
April 27th, 2011Finally got around to making some of these (using Moda’s Hoopla charm packs and a WOW fabric cut into 5″ squares for a baby quilt) and they are adorable and SO easy. Good thing, since I found out since starting that it’s going to be twins, so I’m going to make twice as many for two! Thanks so much for providing such a great idea for free … this was better than many of the store-bought patterns that still look like charms just sewn together!
May 23rd, 2011… and finally blogged about it today with pictures - see linked website. :-)
July 22nd, 2011